Jetson Engine v2 User Guide for Nvidia's Xavier Devices
Welcome to the user guide for setting up Jetson Engine v2 on Nvidia's Jetson Xavier NX and Jetson AGX Xavier devices. Please note that Steps 1-3 are to be done on the Xavier device end and that Steps 4-6 are to be done on the laptop client with ChessBase.
1. Prepare the Xavier Device: The Xavier device is running on Ubuntu Linux 18.04 for ARM64. In this user guide, the device has IP address 192.168.55.1 with hostname jxvnx03, and is connected to the client via MicroUSB-to-USB cable. Please follow this special procedure on how to set up the Xavier device and configurations. You will also need to use PuTTY to log in to the Xavier device.
It is recommended to use a dedicated account in the device to hold the engine folder. In this user guide, the account is "jetson" and the home folder is /home/jetson.
2. Copy Backend Package to Xavier Device Home Folder: Download JetsonBackend_Xavier.zip file on your computer and copy it to the Xavier device home folder mentioned in Step 1. Use pscp to copy the zip file by typing the following command:
pscp JetsonBackend_Xavier.zip jetson@192.168.55.1:/home/jetson
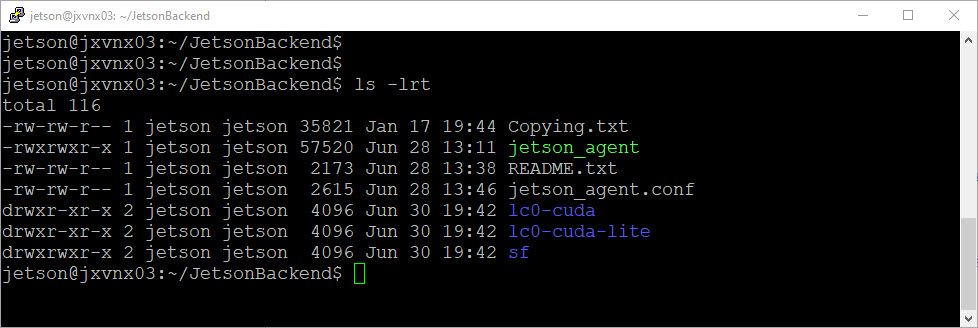
Once the package is copied to the Xavier device, unzip it. You should see the subfolder "JetsonBackend" appear. The JetsonBackend folder contains the following contents:
-
Engine agent jetson_agent: An agent is the program that accepts connections from ChessBase clients, and then distributes UCI requests to the backend engines and relays UCI responses back to the clients. The agent is the only program a user needs to run the backend server. In the Xavier device, the agent is jetson_agent.
-
Engine folders: Each engine folder is associated with an engine that can be launched in the server. The folder name (EngineName) must be set in the configuration file (jetson_agent.conf) to link to the actual engine binary to launch. Different folders may use the same type of engine with different configurations.
-
Note: each engine folder has the engine program in it. Please do not attempt to manually load the engine program since engine programs are automatically loaded by the agent.
-

-
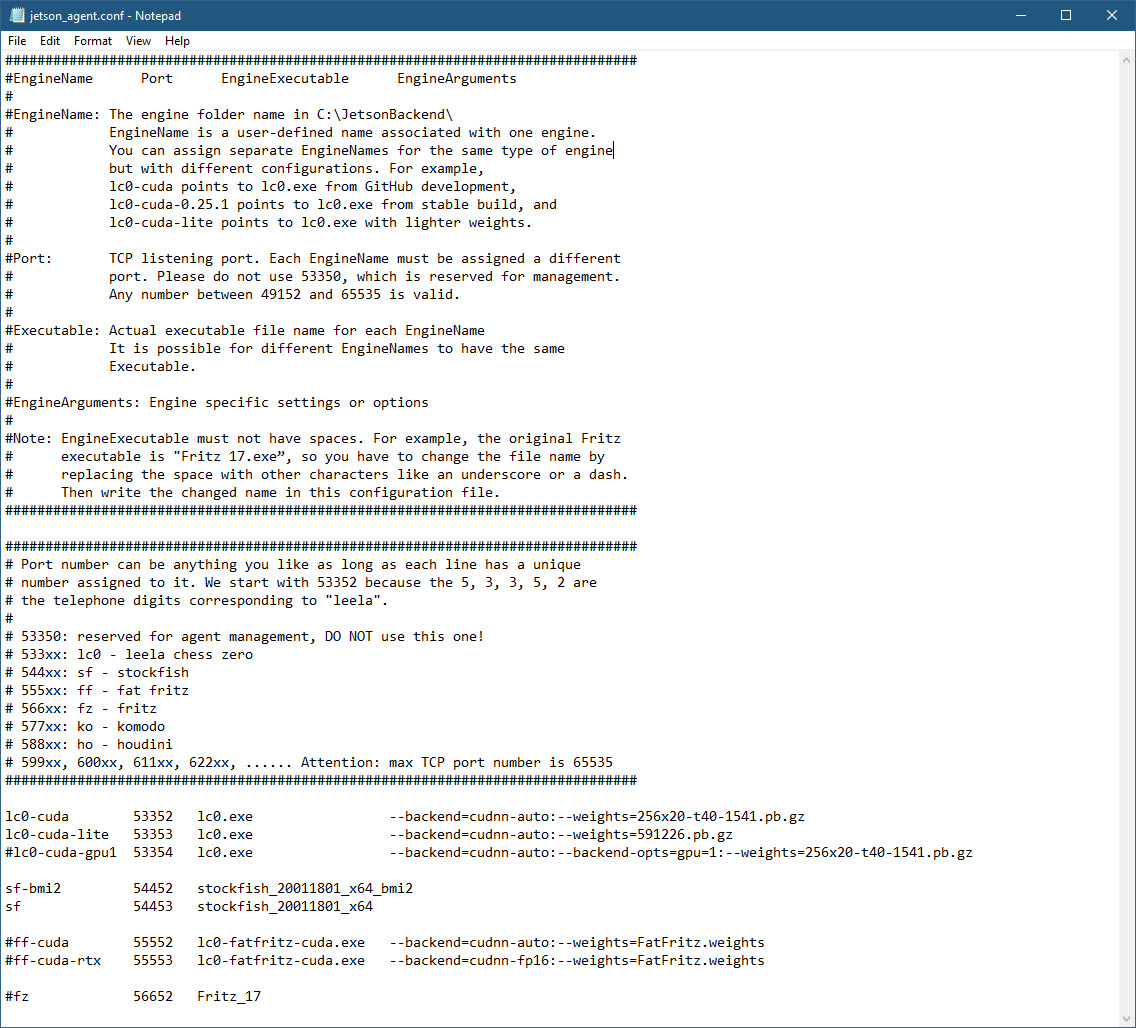
Engine configuration file (jetson_agent.conf): The configuration file tells the agent where to look for the engine program and what configuration options to use with it. Detailed information on how to set configuration is in jetson_agent.conf. Here is an example of what the configuration looks like:
Here is an example of what the "JetsonBackend" folder contents look like on the Xavier device:
3. Launch the Backend Agent on the Xavier Device: After the engine backend package is installed in Step 2, you can now launch jetson_agent. First, go into the “JetsonBackend” folder. Then launch the agent by typing "./jetson_agent".
Note: You might run into the following error:
-bash: ./jetson_agent: Permission
denied
You will need to add an execute permission to the agent program by
running "sudo chmod a+x jetson_agent"
Once the agent is launched, all the configured backend engines will be waiting for connections from ChessBase clients that are able to access it.
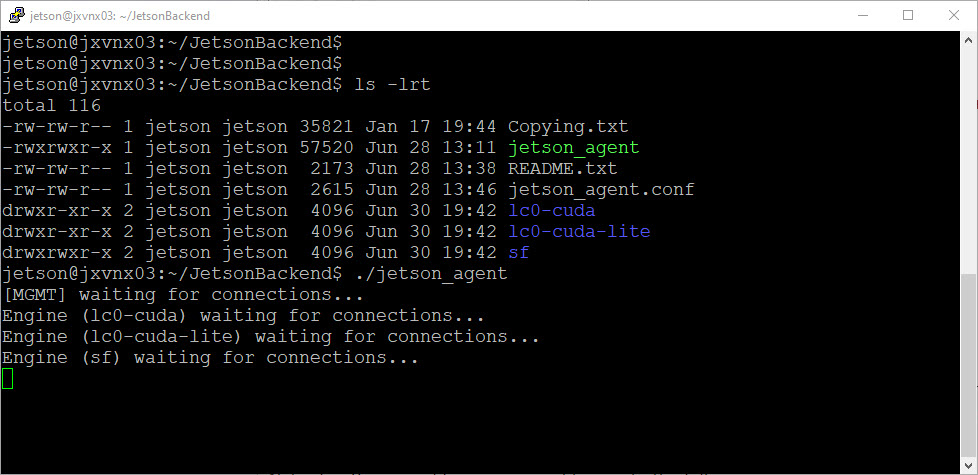
Xavier agent loading three engines based on configurations
Here is some extra information you might find useful:
Agent Loaded Automatically: The backend server is the machine providing services, so you may want the agent to launch automatically when the server is up to avoid having to log in to the server and launch it manually. To achieve this, you may set a cronjob. There are other ways to automatically load the agent.
Agent Loaded in the Background: When manually loading the agent, we suggest loading it in the background. There should be many different ways to load the agent in the background. One possible way is to run "nohup ./jetson_agent &".
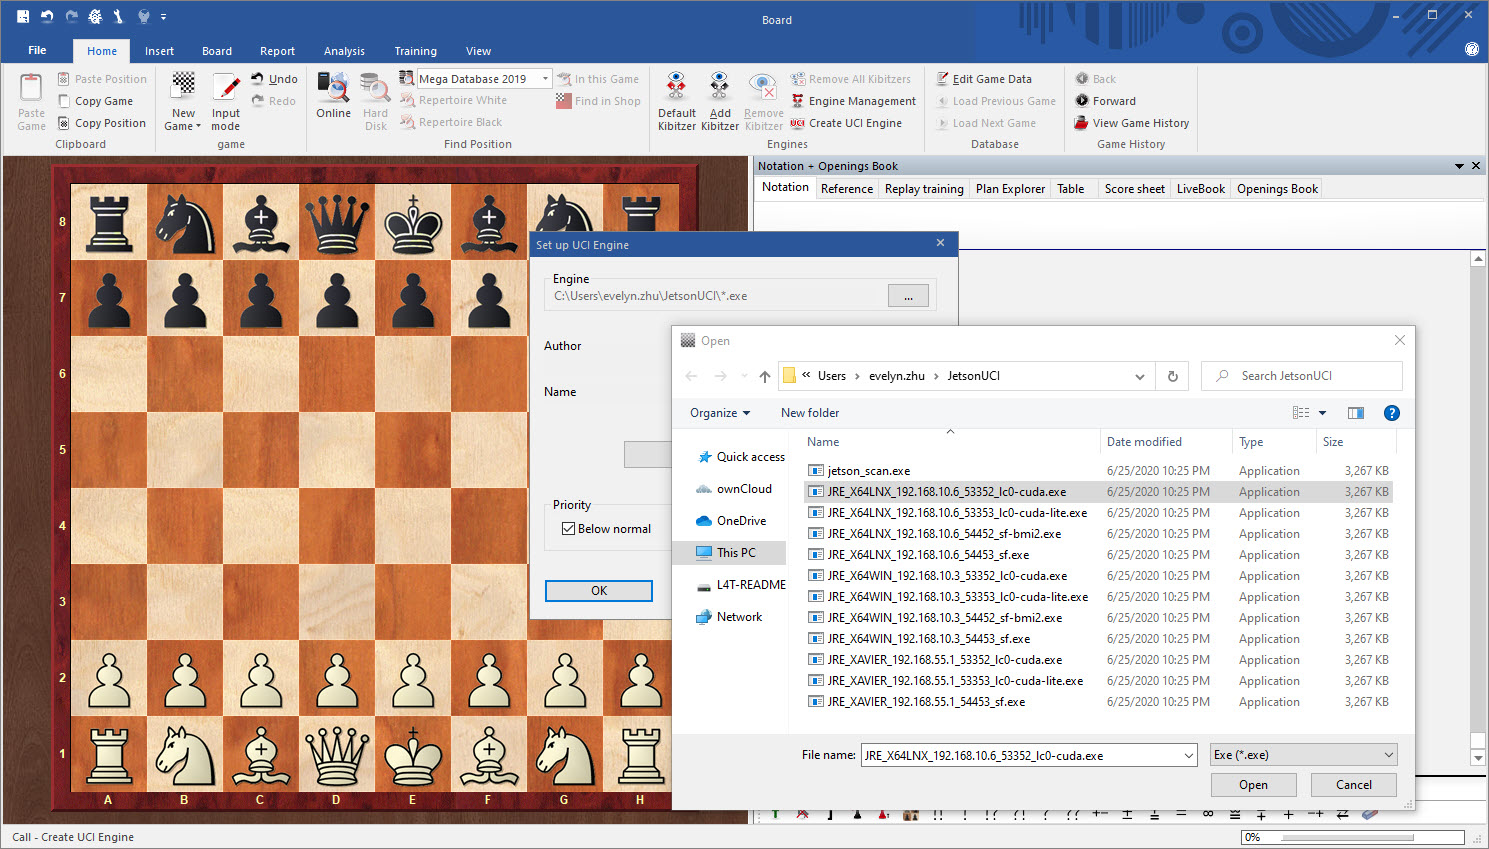
4. Collecting ChessBase UCI Engines on Client: Please download JetsonFrontend zip file, save it anywhere in your laptop (for example, C:\Users\username), and then unzip it. The subfolder "JetsonUCI" should show up. In this folder you will see three UCI engine executables:
-
JRE_XAVIER_192.168.55.1_53352_lc0-cuda.exe: Lc0 engine with a T40 weights file.
-
JRE_XAVIER_192.168.55.1_53353_lc0-cuda-lite.exe: Lc0 engine with a lighter weights file (faster calculations).
-
JRE_XAVIER_192.168.55.1_54453_sf.exe: Stockfish engine.
You may refer to the general user guide to understand the naming of the JRExxx UCI engines.
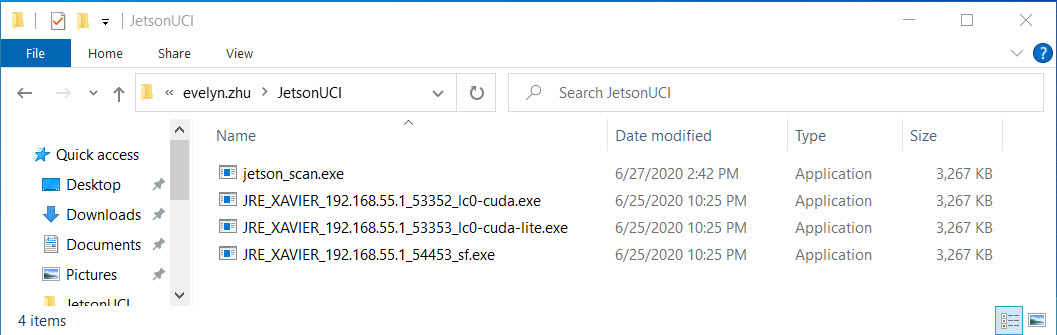
JRE Engines for Xavier Device
5. Create UCI Engines from ChessBase on the Client: Launch ChessBase and click "Create UCI Engine." Go to the "JetsonUCI" folder where those JRExxx engines were generated. Select one of the engines to prompt ChessBase to issue UCI commands to retrieve engine information. The UCI commands will be relayed to the backend server and the responses will be transferred back. ChessBase actually has no idea the engine is located outside. Repeat this step to load all those JRExxx engines.
Creating UCI engines from JRE executables
6. Launch and Run UCI Engines on Client: In ChessBase, go to "Analysis" -> "Let's Check". The default engine that comes with ChessBase is usually Fritz. To switch, select any of the newly created JRE engines from the "Load engine" box. A JRE engine will run.
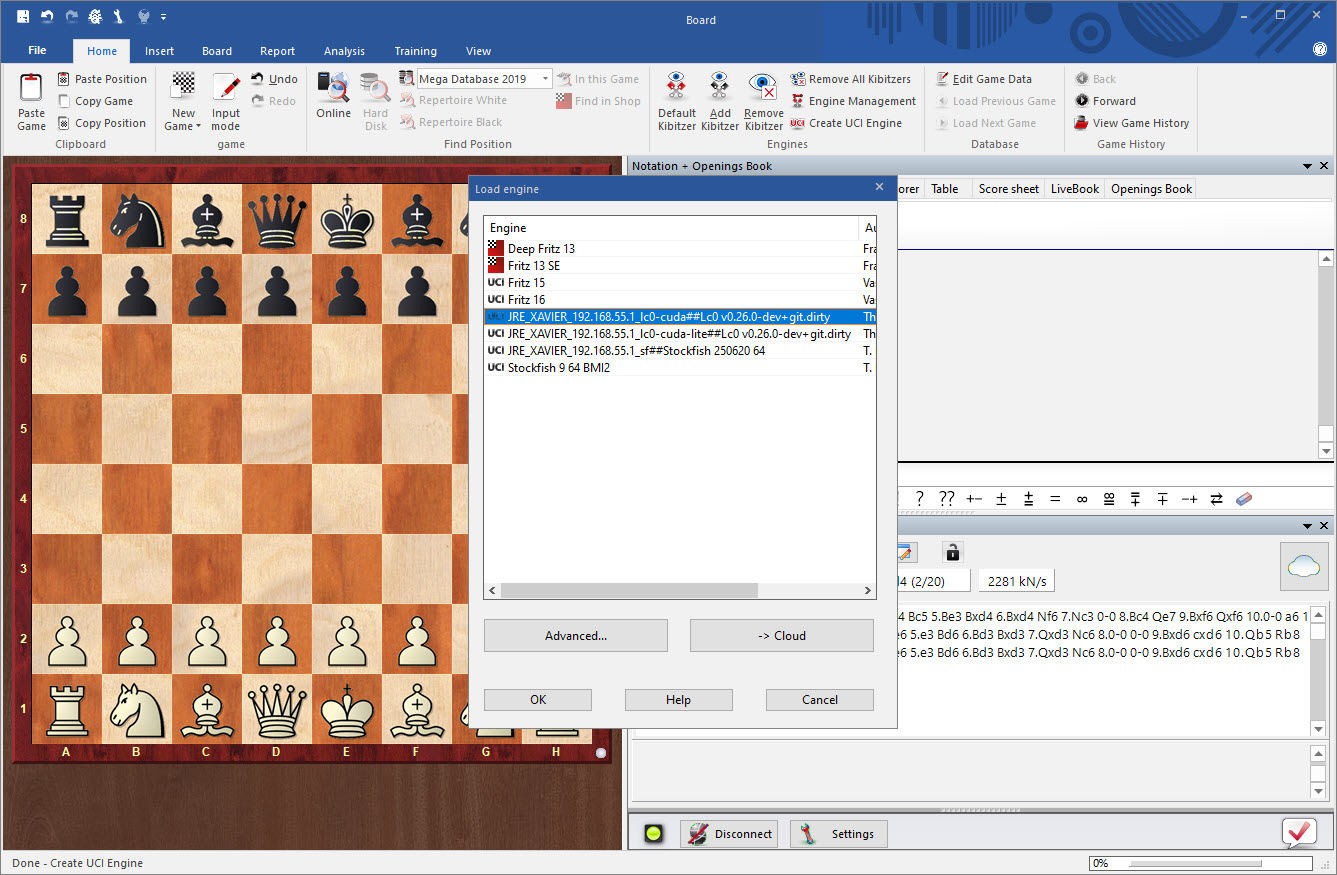
Normally, the engine names shown in the "Load engine" box are the "id name" string returned by the engine. The Jetson agent in the backend server intercepted the "id name" string and then added JRExxx string to allow for easy identification of where the engine comes from and what type of engine it is. For example, the real id name for a lc0 engine is "Lc0 v0.26.0-dev+git.dirty" whereas the modified id name is “JRE_XAVIER_192.168.55.1_lc0-cuda##Lc0 v0.26.0-dev+git.dirty”. Anything before "##" is an added JRE string and anything after "##" is the original id name string.
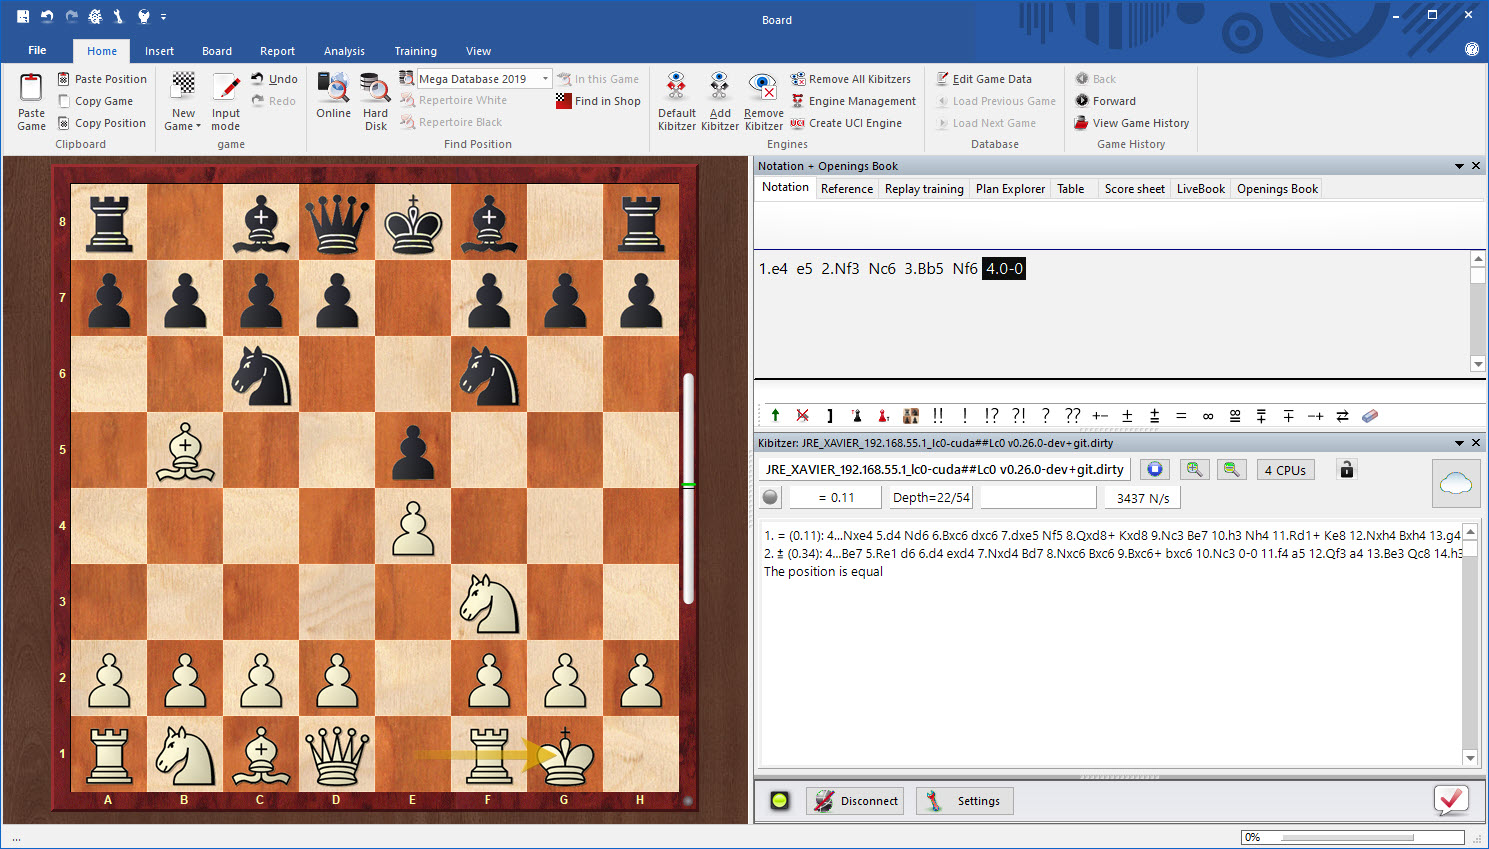
Position evaluations by lc0 running from Xavier backend
Summary
This six-step procedure is a one-time thing. Once the JRExxx UCI engines are loaded into ChessBase, they will stay there and are good to run, provided that the Jetson agent is running in the backend server. Hope you found this process to be simple!
Note: If you would like to load and run your own engines in addition to the three we provide, please refer to the general user guide on how to do so.
Note: If you would rather not go through the steps of setting up the device (Steps 1-3), and simply want to have a device ready to use, then feel free to contact us. We'd be very happy to purchase all the parts needed to set up the device, install all software packages on the device, and mail a complete package to you. After that, all you would need to do is use the provided MicroUSB-to-USB cable to connect the Xavier device to your Windows laptop, power on the device, and then follow Steps 4-6 to download and run the three UCI engine executables.